Wednesday, 31 October 2012

Happy Birthday Pumpkin


The challenge this month on the tando creative blog is to use orange, green, purple and black...so I thought I would make a seasonal birthday card.  I've used some of the left over chipboard pieces I had after making this fridge magnet - so I used half the little tando banner and covered it in seedless preserves distress ink with some liquid pearl drops too, and then I cut up the remains of the flourish that I had used for my flower leaves to make the pumpkin leaves.  These I covered in olive green distress ink and then went around the edge with brown.  I cut my pumpkin shapes out of some scraps of an old October Afternoon paper and then covered it in some ripe persimmon distress ink and then edged it with the gathered twig coloured distresss ink.  Next I added some dashed pumpkin lines.

On the card itself I used a kaisercraft die cut sheet to make the frame - a tip from Emille and used the orange and purple distress ink for this, then a couple of lines of tissue tape and a martha stewart tape, a small square of green paper behind my pumpkin and I also used it to make my cocktail stick banner.  Layered it all up using some foam pads too and the final touches were some purple flicks of purple violet cosmic shimmer mist and then some green and white dots of liquid pearls too.

and I'm looking at banners over on Created by ATDML


Monday, 29 October 2012

On an Adventure


This weekend was the Ukscrappers - Now We Are Ten cybercrop...and this is a more leisurely cybercrop, so if you haven't found it yet but would still love to do the classes and be in with a chance to win prizes you can - most of the challenges and classes are open til Friday...though there are more challenges throughout the week and 2 more classes on Sunday so definitely worth a check out.

Here is my debut page for the cybercrop class the focus is on some paint, hexagons, chipboard and distressing all my favourites.  So if you would like to know how I made this page here is a link to the class....and better if you fancy having a go then load it up over on ukscrappers in the gallery - likewise if you want lots more inspiration then have a peek at the gorgeous pages there.


Wednesday, 24 October 2012

7 Years Old


Another page with the lovely Midway Papers and some Tando Creative Stars :)  My page is up on the Tando blog too as this week we are focusing on basic shapes and I just think you can't go wrong with a star, be it boys, girls, holiday, Christmas....any occasion can have a star :)

I started the page with my trusty plate - to lightly draw a circle that I then stitched over 3 times.  I then layered a mixture of the midway papers - distressing and stitching the edges - I also use some of the stickers and a strip of the MME Christmas washi tape.  I printed a large typewritter font number 7 on the computer to use as a template for my oversized number and stitched this too (yes that was a little fiddley). I covered the stars in white and then yellow acrylic paint and added a little glitter - I dabbed the paint on them to keep the texture and once dry placed them around the edge of the circle.  I then added a banner at the bottom of the circle, and a couple of the Midway stickers and a Studio Calico camera too.  The last touches were a small cluster of pennants/banner at the top of the page and some flicks of white paint.

This is my son and his smurf birthday cake....which was colourful and covered in plastic smurfs and then sprayed with some amazing edible silver spray which the kids loved.  I love this photo and the way the candles are reflecting in his hair - no idea how to make that happen but it did :)

There will be more inspiration over on the Tando blog all week so here is a link if you would like to check it out.


Monday, 22 October 2012

You are my Sunshine


There is a new sketch from the lovely Val over at the Studio Blog, it is based on a page from Tessa Buys, so here is my take on it using some of October Afternoons Midway collection.  A while back I was lucky to be selected as one of the winners of some candy on Amy Hellers blog on a October Afternoon Cake Walk hop...well it didn't arrive and I just figured it got lost somewhere in the post.  Then a few weeks a go I was contacted by one of their team apologising for the delay as there had been some problems their end and they sent me a pack of Midway and their 9 to 5 collection - and it is all gorgeous so a big thank you to October Afternoon.  

Back to the page - this is my son on the beach on holiday...doing what he normally does on beaches - collect water, build things and study the wildlife :)  I started with a spritz of yellow for the background and then some splatters of mango blaze cosmic shimmer.  I then die cut the You Are My Sunshine tag on my Silhouette and layered up washi tape behind the words.  I mounted my photo and added some off cuts behind the photo and made a little tab at the top of the page.  Before I stuck it all down I used my Teresa Collins (she is the sponsor for the prize this month at the studio) stamps - both the bingo card and then I made the words into some sunbeams too...I love those words I can see them appearing on many a page - I think I have a small obsession with typewriter fonts developing!

So if you would like lots of inspiration and to join in the challenge here is the link.

Also the Ukscrappers "Now we are 10" cybercrop is happening towards the end of October so if you haven't discovered Ukscrappers do go and have a look - you get to join a team and then there will be lots of free classes as well as challenges to join in and there are loads of prizes on offer...it's not going to be completed just over the weekend so you will have longer to do the classes and take part - I love them and always learn loads and meet lots of new friends on the team...here is a link for that too 


Friday, 19 October 2012

In the Grain


Here is a page I loved making...  I was mulling over the subject of my Trends on Tuesday post over at A Trip Down Memory Lane and decided on woodgrain, and then thought I really ought to go all out on wood (not sure what it would end up looking like!).  I have to say that I was pleasantly surprised by my page!

My kids obliged me with a lovely shot in front of a beautiful log wall when we were out, and I decided to carry the logs on for the mount around the photo.  I punched 1" circles and then distressed the edges and used a white gel pen for the grain (the paper is Crate's Farmhouse collection).  I added a Simple Stories bingo card, and then some of the Farmhouse stickers and some burlap too.  The alphas are a mix of some woodgrain thickers I picked up on my holiday and a prima pack, I also included some journalling behind the photo.  I had decided the title for my post before I did the page - which was in the grain....and then it turned out to be a great page title too...as the journalling looks at some of the similarities my kids have to me and my husband (like both of our parents reckon both of them look like us when we were kids :) makes me smile every time as I look nothing like my husband!! so I guess they are both a good mixture) and how my eldest gets cold in swimming pools quickly like me and my youngest doesn't...in fact like his father he could wear shorts all year around!


Wednesday, 17 October 2012

Conquering Everest


This weeks theme on the Tando Creative blog is things that fly....so it was the perfect excuse to use the clouds and hot air balloons that they stock.  I used one of the clouds to make a stencil and painted thick layers of gesso through it.  I also managed to create my own clouds on my silhouette by just welding circles together, and die cut lots of them out of some Studio Calico and My Minds Eye papers.

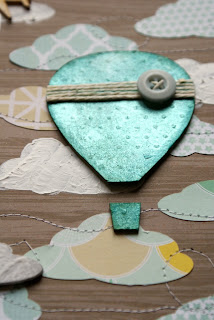
Once the clouds were stuck down I added some swirls of stitching, which were easier to do than I thought, then added some Teresa Collins acetate behind my 2 photos - the one of the rollercoaster you can see has my husband and son on it (yes I did take lots of photos of people we didn't know going down on that roller coaster too.....so it was a hunt for the right photo :)).  I tucked an Elles Studio tag behind the photo for the journalling and then added some of the chipboard clouds which I had liberally covered in acrylic paint at either side of the photos, and an Amy Tangerine sticker.  I used my cuttlebug to emboss the Hot Air Balloon using the swiss dots embossing folder, I then covered it in the Peacock Cosmic Shimmer mist, adding 5 strips of string and a button to the balloon.  The last few additions was a wood veneer (studio calico), some prima and MME alphabet and Crate Paper stickers.  So I think I have really mixed up my kit on this page and covered lots of manufacturers which I don't often do to this extent!


Thursday, 11 October 2012

Tyntesfield Mini Album


There are rather a lot of photos for this one.  For this one I have to say thank you to the lovely Brenda who goes to my local craft group, and showed me a fantastic one sheet mini album (courtesy of Rosemary Merry who has an excellent video tutorial on her blog here it on the right hand side).  So I collected my photos from a day trip to the National Trust Property and grounds at Tyntesfield.  I am completely out of season as when we went it was nearly Easter and so the kids spent lots of time running around on an egg hunt.

I used a sheet of October Afternoons 9 to 5 collection for the base (all the papers are part of my kit from A Trip Down Memory Lane....so here is a link to the gallery for lots more inspiration).  I worked out the sizes I needed my photos to be and trimmed them down then matting them on white card stock.  On ones side of the book I focused mainly on the kids running around, the other side is some of my attempts at more arty shots around the grounds - like the beautiful tree line walk - very Pride and Prejudice.

I die cut the I love days out on my silhouette and then just used little bits of the 9 to 5 papers to make journal patches or small embellishments, as well as a little punching and the odd doily too.  I used a typewriter font free from the web to type out the titles...and here are all the photos.  It is one of the quickest minis I have put together and I reckon it would work well for a Christmas gift  too and Tyntesfield is beautiful.


Monday, 8 October 2012

Our Dream Holiday


The theme for the next fortnight over at the Studio is family......so I picked this shot as it is one of the rare family photos that we get taken, and it was in probably our favourite Disney Park - the Animal Kingdom....and this was our big dream family holiday.

I started the page with a circle mask and some texture paste, then I did some spritzing with cosmic shimmer mist and a little bit of glimmer mist.  The papers are all Echo Parks This and That Charming range, I added some strips behind the photo and created a little banner, and had to use the camera sticker behind my journalling.  I also added a prima flower that has been lurking in my stash for a while....I am trying to use up the pretties :) and a little bling.  A little bit of washi tape in the corners (K and Co smash tape) and some sequins from pound land.  The title is a mixture of the stickers in the This and That paper pack and also websters pages, some twine around the photo and that is my inky page :)

There are loads of other fantastic pages over on the blog and the Teresa Collins DT has joined us and there is a prize too....so here is a link for you to get inspired :)

Also do check out the Tando blog hop which will lead you to the post below...here is the link...for a fantastic giveaway


Sunday, 7 October 2012

Tando Birthday Blog Hop - History of Tando - It's on the Fridge


Welcome to Tandos 3rd Birthday Blog Hop - a "History of Tando'.  I am the last hop before you need to go back to the Tando blog, and it's quite fitting as I used one of Tando's first products - the Leaf Flourishes and also one of their most recent - the Works a Part kits called Come Fly with Me.  I created a fridge magnet for today....and being a scrapper I obviously have to have a photo on it. 

I started by covering the chipboard base with white gesso and then layered on some old book pages too.  I spritzed the base with blue patina glimmer mist and also some black glimmer mist and left it to dry.  I painted and covered the banner and hot air balloon in book paper.  Once the paint was dry I added a layer or crackle paint (which didn't work quite as I expected but then I didn't have a thick layer of paint on the base, however it did give me a grainy textured surface that I quite liked - so a happy accident).  I covered the leave flourish with some olive green distress ink and then went around the edge with tea dye.  Once the paint was dry I layered up some paper strips and tissue tape to poke out behind the photo, and added a strip of cream lace to the bottom. I then stuck on my photo and started layering up all the elements (have inked the edges 1st) including my large prima flower, the clouds and bunting. I added a little bull dog clip on the bottom (note for next time make the hole and do this as one of the 1st things) and used some wire to hang it on and then added paper over the back to protect the end.  Last step was to add a magnet to the back - mine is just an old piece where the front of the magnet fell off and I used my strongest tape to stick it on the back with.

I did get my son to write me a note, as I couldn't find the one that he had spontaneously done for me that told me I was the best Mum in the World! These little magnets make great Christmas gifts...even my husband tends to acquire any I make for his magnetic board at work...so a crafty man gift too.


From here please head over to the Tando Blog where you will see the amazing giveaway for taking part - here is a picture of the goodies.


Here is a list of the full hop just incase you get lost on the way or haven't started it yet :)

>>>>>>>you are here >>>>>>>>Katherine


Wednesday, 3 October 2012

Who shall I get next?


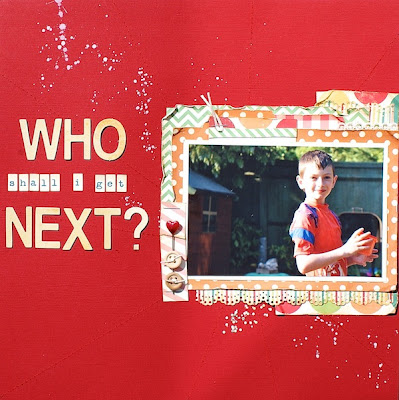
I love this photo from the summer, we are in my brothers garden and the kids are having a water fight.  My son has his cousins cup and is just weighing up who he should throw water over next!  I love the photo and the sun on the side of his face.

I used October Afternoons 9 to 5 and Cakewalk collections for this page which I made for the gallery over at ATDML.  I started the page with a starburst pattern - it is really hard to see on the photo as I stitched in red (I'd seen a similar effect on a white page on pinterest :)) so it stands out more when you see the page in real life - but not in photos!  I then used lots of offcuts and small bits of paper to layer behind the photo.  There is lace, I punched out a strip with my Martha Stewart doily lace punch and then used the waste to sprinkle on the page too.  The journalling is behind the photo - I made my own tab out of paper offcuts (I really like doing this as it is so easy) and you can see the string stapled to it so it can be pulled out.  The title is a mix of Girls Paperie and October Afternoon, then a few splatters of white acrylic and there you go.


LinkWithin

Related Posts with Thumbnails