Saturday 24 December 2011

Hot chocolate


My first instagram photo on a page!  Quite so big the quality of the photo isn't soo good, but I love the grainy effect it gives.  So for this page a complete mix of supplies...mostly Crate Papers Farmhouse (I love it :)) and some Tim Holtz tissue tape and my doily stamp.  I started with the photo, and matted this on brown card stock and then inked and ruffled the edge.  I cut out a few contrasting pieces of paper from the farmhouse range and inked, ruffled and stitched them.  I used my EK success circle book punch down the edge of one.   I also added a glassine pocked for journalling behind the photo (courtesy of another of Hannah's beautiful kits) and a K and Co journal tag (I just found the book in my stack...it had been lost for some time!).  The green lace was from Art from the Heart's beautiful packaging and I added some twine here.  Under the photo I used one of the offcut strips that are on the bottom of the farmhouse papers, and some prima lace too.  

I meant to stamp my doilies before I stuck the paper down....however I didn't remember and couldn't get the papers off easily! So I masked the area and stamped them....but that left a large gap (don't ask) so I used one of the crate paper stamp edge stickers to cover it!  I piled up some chipboard embellishments in the corners, and some of the paper ones....adding some stitched swirls of steam from the cups, I used some mini tags on the other side and decorated them...then a bit of tissue tape in the top corner with some vintage buttons and a few splatters of glimmer mist to each corner.  There you go my 1st instagram page.

The photo is of my kids enjoying a hot chocolate at the end of the pier where my Grandma lives....when we visit they love to walk down the pier and stop for a drink...it's all covered and you can look out to sea - so it was lovely to catch this moment in a photo.


I want to wish you and your families all a fantastic Christmas

Monday 19 December 2011

Cookies in a Jar


Over at It's a Creative World I have posted a recipe and instructions for making cookies in a jar - they make great gifts and are easy to make (as you can see my layers aren't that great, but the jar was a little wide!).  Anyway here is the link http://itsacreativeworld.typepad.com/its_a_creative_world/2011/12/cookies-in-a-jar.html

Christmas Tags


I keep looking over at Tim Holtz 12 tags....and they are beautiful and I want to have a go, so that is on my list to look out for next year.  However it did inspire me to created some of my own tags, and I have quite a few kraft tags left from my November Handmade Hannah kit...so here are 3 I managed to put together quite quickly.  The papers and embellishments are from Hannahs October kit and are MME, with some Crate Paper Chipboard, and echo park journalling page for the sentiments  - not sure where the snowflakes and snowman are from.  Here are the tags in a little more details.


I choose the gingerbread chipboard piece to be the centre of this tag, and then started on the background.  I used my Martha Stewart doily lace punch (still one of my favourites) and cut out and punched several strips of paper in the candy cane red and white.  I inked the edges, then stuck them down and zig zag stitched along each side.  I cut inked, stitched and ruffled a green mount for my gingerbread man and then stappled the saying underneath.

The snowman tag started with some watered down white acrylic paint, which I flicked over the tag.  I then cut a small hill for the snowman and inked the edges, I added the stickers and stappled the sentiment - didn't even need to put any glitter on as the pieces are all glittered.

I've seen this Christmas tree over on WeScrap so thought I would put it on a tag.  It is great for using up  off cuts of paper, I literally just cut strips of paper and then rolled them around a skewer and stuck them together with double sided tape.  They now resemble straws, so I then cut each straw down to make the  triangular shape just taking a small amount of the end and building it up.  I glued this down with a wet glue, and add a chipboard and stickled star to the top (think this is maya road).  I used a scrap of my doily edge punched paper and put it under the tree and then two strips (again the remnants of the doily edge punching) on the bottom which I added some stickles dots to.  Once the tree was fry I added some red gems and my sentiment.

It was a lovely change to have a go at making these and I was surprised how quickly they came together....and I already have plans for them.

Wednesday 14 December 2011

Surf

Another summery page....just as it gets cold!  It is a surf shot of my DS from our holiday - lots of our photos are waterbased from that holiday.  For this I used my spellbinders labels die to make some frames, and I also cut some out  and used them as a mask of blue and orange glimmer mist.  The papers are Crate Paper Farmhouse, I also had a go at using some Teresa Collins white printed acetate.  So I started with the misting, and then layered up my frames for the background.  I made some bunting and swirled my bakers twine using some clear drying glue and then added the little flags. I added a yellow square of Farmhouse paper behind the photo, inked and stitched it, then the acetate on top.  With some of the offcuts of the label dies I layered them behind the photo, and the tiny blue bit is the journalling which pulls out from behind the photo.  I also made a little tag at the bottom out of my off cuts of paper, a crate sticker and bakers twine.  Then added some shells and other elements around the photo, I slid a little pile of punched paper there too (martha stewart doily edge lace), and the title is American crafts thickers - I used quite a bit of twine on this page to tie the elements together (almost literally :D)


Tuesday 13 December 2011

Christmas Decorations

Sorry everyone for not posting as often as I would like...I've been working on lots of bits, scrapping and otherwise.  However I sat down last night and did another page which I will be able to share with you soon.  As Christmas is getting very close I thought I would show you a couple of decorations that I have made.  I saw a cotton spool decoration over on twopeas and this is my version using some of the lovely Teresa Collins papers and ribbon and twine.  I also made a little angel - these angel decorations are part of my childhood as I always seemed to make one at some point on the run up to Christmas!  They are really easy to make, you start with a semi circle of paper and then curl it into a cone, cut out a another slightly smaller semi circle for the wings, and you can add a doily semi circle too (stick these onto the cone at the back).  I then wrapped some ribbon and lace around my one, and added a vintage button for the head - if you are doing it with kids then a circle they can draw the face on, some wool for hair and lots of glitter for the body and wings - you can make them any size.  All the papers and bits of twine and ribbon were from Hannahs November grab box and are from Teresa Collins, the spool and button were the only bits out of my stash.


Tuesday 6 December 2011

Smiles


I made this page using the Prima Build-a-Page sketch for this month....it had a banner and lots of lovely shapes so I had to have a go.  This is a photo from our half term trip to Dover Castle...which was quite breezy and here I am with my boys at the top of the tower. 


 I used Prima's Pixie Glen papers, and then a few left overs of Flights of Fancy (the butterflies and the text paper).  I started making the background sheet - I made my own templates out of card and then adjusted it to fit the size I wanted (just by cutting it smaller!), then I distressed and inked and stitched it.  I made a smaller thin strip of the same shape from the flights of fancy paper to add another layer.  I mounted the photo on some white card and inked it with tea dye distress ink, and then transformed one of the Pixie Glen journal cards with some dictionary paper and some words that are on the back of the papers, I inked, distressed and stitched them.  I used my spellbinders label die to cut the journal shape, and added some liquid pearls and distress ink to this.  I cut out the banner and did a double layer and then stitched this to the page, curling and distressing it, I then added some liquid pearl scallops and buttons with some string dangling down from it on the top of them. Next for some of the Prima flowers...and since I was on the page I dug out the pink ones and added a few of the smaller paper prima flowers, you can't see that clearly but I added some thread behind the buttons in the centre to give them a messy stitchy look.  I also added in one of the beautiful glittery prima birds.  The final embellishments were some butterflies from the Flights of Fancy paper, and my title stickers....and then a few splatters of paint and mini pearls.  So quite a girly page from me which I loved making!


Thursday 1 December 2011

More Felt Flowers

I've been making some more felt flowers from some super tutorials I have found on my blog browsing.  They would make great Christmas gifts for friends, family, teachers - there are 2 different flowers one easier, one harder so do pop over to the Its a Creative World blog to have a look - there is also loads more inspiration on there too :)

Monday 28 November 2011

You're So Sweet


I delved into some more of my Crate Paper Farmhouse collection for a photo of my DS on holiday and his cheeky smile - we are sat in the town square and they had been playing all sorts of hiding games and just messing around before we got some evening snacks in.  

I've seen a few pages with rows of banners underneath - can't find any links to say where I saw them, but that was my inspiration.  Also part of the November challenge over on We Scrap was to use some material on a page, so I decided to use up some more of the massive piece of Burlap that I have.  I cut a mixture of flags and crumpled and inked the edges.  Next I added 2 lines of green stitching, and then zigzaged in and out with yellow thread, adding a brown button on either side.  I mounted the photo on white card stock, inked around the edges.  Then I started to layer up the pieces behind the photo starting with the doily and acetate from one of Hannah's grab boxes which is also where the cake, flowerk, doily piece and journal piece came from.  I used my Martha Stewart Doily edge lace punch on a couple of pieces of left over card, , added these and some of the stickers and die cut pieces from the farmhouse collection as well as the American Crafts cupcake.  The title is from the Farmhouse chipboard .... and one more credit goes to my sister-in-law as the red crochet flower you can see under the blue and green on is one she made for me.  I added a few splats of paint and some tiny buttons and the journalling ticket behind the photo.


Monday 21 November 2011

Traditions


We Scrap have a November challenge and one of them was for a photo-less page, so I decided to have a go using some more of the papers from my Handmade Hannah Christmas Box.  I used the Teresa Collins number piece for the background and then added some brush strokes of gesso...and then sprinkled some glitter over the top, which you can't really see in the photos.  I made some smaller tags out of kraft paper, and stitched around the edge and added some ribbon to the middle.  Each tag represents a tradition at Christmas in our house from decorating the tree (another Michelle tree), advent candles from my Mum - which I made out of the pearls, and then cut a flame. Nativity productions represented with a star covered in glossy accents and then some more glitter, wrapping presents decorated with a paper bow.  Going to Church on the day itself - not having a stamp I had to draw this and then added some liquid pearls for the snow, then spending Christmas Day with the family - I stamped and cut out the word then added some little hearts decorated with glossy accents.  I made a little rolled banner to journal the tradition.  When it came to the title...I had run out of t's so I used the inverse of the sticker and then filled it with stickles glitter glue.  Here is a close up of a few of the tags and details.


Christmas 2010


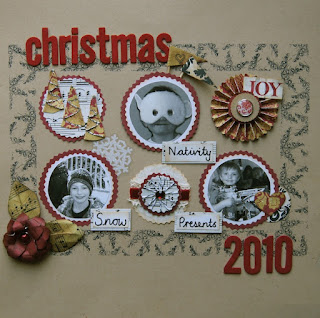
Another page from Hannahs beautiful grab box Christmas kit.  I decided to make a page with a mix of shots from the Christmas period mainly as I didn't have enough really good ones to make a page, so I have my DS as a sheep in his nativity, one of my eldest in the snow and another one of the presents we unwrapped on our first family Christmas celebration (we normally end up with 2 celebrations as we live far apart).

For this I made a frame using a snowflake stamp that was in my previous grab box and some black memento ink.  I lightly drew the outline of the square and then stamped along the inside and outside edge using a piece of scrap paper to protect the kraft card to make my frame.  I used my gesso tub to draw the circles and then cut out the paper and photos.  I used pinking shears to cut the mounts for several of the circles too.  I had a go at making Michelles lovely and beautifully easy Christmas trees for my 1st circle and I used a mixture of embellishments and photos in the rectangle shape. I hand wrote some labels for the pictures. Then had a go at making a poinsettia style flower to keep in with the Christmas theme, though I think it needs some perfecting - it the same method as my rose tutorial, but just with a more poinsettia shaped flower. I used the lovely flock alpha and added some stickles and one of the snowflake stickers too. I've still got another page to show you, and lots of bits left over so I think I will make some cards and Christmas decorations too.


Stitched Christmas Tree tutorial


Here is my tutorial to show you how I made the Christmas tree embellishment on my page from Handmade Hannahs Christmas kit.


You will need
  • Christmas tree die cut, or your own design
  • needle
  • 2 colours of green embroidery thread
  • funky foam or an old mouse mat
  • buttons or other embellishments

  1. Diecut/design your own Christmas tree, then using a piece of funky foam or an old mouse mat place your tree on top and pierce holes around the edge of the tree with a needle. I do this as the foam makes it easier to make the holes, and it is easier to stitch after you have made some guide holes.
 2. Using the lighter green thread sew all the way around the tree.
 3. Once finished, tidy up the ends and stick them to the back of the tree using some tape.
 4. The next step is to add the zig zags of thread. Using the darker thread, start by coming up through one of the holes near the base and then take it across the tree and underneath one of the outside stitches, then go across to another stitch and so on. As you get more threads across the tree start weaving them in and out.
 5. Once done take your thread back through one of the outside holes and secure it on the back with tape.


6. The final part is to add some more decoration to the tree, I chose some small buttons, though you could tie little bits of ribbon, or weave ribbon through, add glitter or beads. You could use this tree embellishment on cards and tags as well as scrap pages.

I hope you enjoy making them.


Thursday 17 November 2011

Now I am 6


Here is the page I did for Novembers colour challenge over on the crate paper blog.  The papers I have used are Farmhouse and a bit of the Random collection too, the colours were fuschia, orange and navy blue.  As you all probably know I have been doing Shimelles Pretty Paper Party and the inspiration for this page came from there too.  There was a great page by Rahel Menig where in the centre she had a mini-book that opened out a bit like this.  I started with making and layering up some banner pieces and then lightly glued and them down and stitched a couple of rows of stitching across.  The centeral photo matt is a piece of 12 by 5 and then I folded it into 3 sections, I mounted my photos on it, on both sides and saved a section for journalling (and the piece for sticking it to the back).


  I layered up die cuts and used my punches and placed small bits of paper behind the photo piece as well as lace.  I added a piece of dusty attic chipboard to the front and inked it with brown memento ink and then added some glitter using a quickie glue pen.  The final steps were to add some flicks of colour from my shimmer mists in orange, blue and fuschia.


Tuesday 15 November 2011

All is Quiet


Here is my first page using Handmade Hannahs Christmas grab box (goes on sale Wed 15th November), it is packed with beautiful papers, tags and embellishments and a lovely flocked alphabet.  The only bits I added from my stash were the thread, buttons and stamped alpha.  

These pictures show the calm before the full eruption of Christmas in the house, the tree is decorated, the stockings are laden with presents........ then the celebrations begin. The page started with a great technique my friend Shelia showed me, you use a wax candle and then rub it over your paper with an embossing folder underneath (brass rubbing really) you then paint over it with distress stains - this one is vintage photo, and you can get a nice wax effect...so I rubbed over a woodgrain folder, but didn't leave it there with just the wax showing....I traced over the wax with my silver stickles to give the woodgrain effect. 

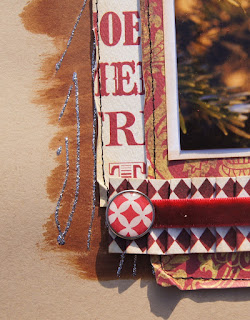
The papers are Teresa Collins and I ruffled, inked and stitched these (I was also quite frugal so the worded paper is cut in an L-shape to fit around the main paper).  I made up a piece of paper ribbon with the diamond check paper, I put pleats in it, and then added some of the lovely velvet ribbon and a brad to the end.  I also drew on a scallop and stitched over it with my sewing machine, then hung the stars from there.  I mounted the photos on white card and inked the edges with tea dye, then I set about making the Christmas Tree which I will save for another post and write up some instructions (as it would make a nice card or tag embellishment too).  I created a pocket behind the main piece of paper and used a tag for my journalling - I stuck another one of the words on the top of the tag and added some more velvet ribbon.  I stamped part of my title, mounting it on foam pads and then used the beautiful flock alphabet for the main word.  So that is my page - it is a beautiful kit and I have lots more plans for it.


LinkWithin

Related Posts with Thumbnails