Wednesday, 30 May 2018

Birthday Cards with Summer Mood


Here are some cards that I made using Summer Mood and lots of the BoBunny essential papers.  It uses a fairly straightforward Cascading card technique.


 My first card uses the Up and Away die set with clouds and hot air balloons, I also added in some rainbows too.


 This shows you a better  view of the card and how it comes together


I then used the cupcake dies to create a birthday card packed with colour and glitter.


Monday, 28 May 2018

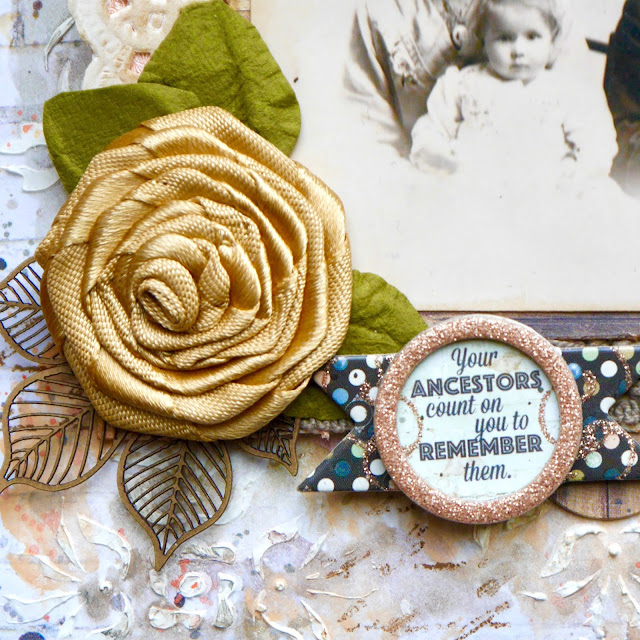
Treasures of Yesterday


I have really been enjoying using watercolours on my pages of late and this one is no exception.  I've used BoBunny's Once upon a Life time to scrap a heritage photo.  I started with the flourish stencil and some white gesso, once that was dry I added layers of brown, green and orange watercolour, then a bit of stamping too - so lots of layers of paints and ink before the papers went on.

As well as the layers of paints and inks here you can see the layers of inked doily and also some die cuts.


I used one of the stickers for my title and bit of sparkle and lace.


I added in a laser cut leaf and some of the chipboard as well as a blossom to complete my page.


Friday, 25 May 2018

Free Spirit


Hello, another page this time using the beautiful Summer Mood paper set from BoBunny, it has some lovely summery colours and I added my own watercolour twist.  I also used the WRMK flower punch to create the large scallop layers at the base of the page.  Furthermore there is a video which you can watch and shows you all the way through the process - you can find it here.


I die cut some lollipops and also the Mandala and then used watercolour paints to add some colour.


I used confetti paste to add a bit of sparkle and also cut out the globe from one of the elements papers.


My title comes from one of the cards, and I added a couple more co-ordinating lollipops to this too.


Tuesday, 22 May 2018

Love


More clean and simple Twilight papers - this one with a grid pattern using lots of the papers and some of the journal cards.  Again clean and simple with a pocket for all your journalling.

I love the painted Home is wherever you are field, so I had to incorporate that into my page!


Again little clusters of embellishments to guide your eye across the page.


The perfect sized journal spot.


Again some more of that beautiful foiling and title fonts.  The next retreat is in November and if you email the shop they will be able to keep you up to date.

Friday, 18 May 2018

Blessed


As well as a messy class I also like to do a clean and simple class too, so I get to see everyone!  For this class I used the new Twilight collection from 1canoe2, the papers are beautifully designed and all the greys meant that they worked beautifully with black and white photos, plus some beautiful gold foiling which my photos don't do just to.


Lots of layers of embellishments.


I love the little jars and the title fonts with all their foiling.


Wednesday, 16 May 2018

Mother - Frame using Once Upon a Lifetime


Hi, I wanted to share with you a frame with you that I made using the new BoBunny Once Upon a Lifetime collection - you can find out all the details on their blog.

I had a play with their perfect petals dies and made most of the flowers, inking and bending them and filling the centres with their double dot jewels.


The frame is also by BoBunny and is their chipboard ornate oval frame, I covered this in white gesso first and then added a mixture of tea dye distress ink and some copper metallic wax.  I also tucked in some blossoms amongst the flowers.


In this collection there is a page of plaques for parents and grandparents - perfect for a heritage page or just as a plaque at the bottom of a photo frame.

I hope you've enjoyed my project, do pop over to the Bobunny blog and have a look.


Tuesday, 15 May 2018

Amongst the Flowers


The final page from my 7 dots class - I love the background papers and this page uses up all the left over bits from the other too, plus lots of the tags.  I added in some stamping and distressed and inked all the edges as well as continuing with my 2 tone mist sprinkles.


I love all the colours in the papers and they way they fade into each other.


A bit of messy stamping to complete the title.


Layers of colour and fabric, mist and stamping.

Saturday, 12 May 2018

Wintry Walks


More from my Paint Chips class - I love all the colours in the papers and this page was all about layering.  Bits of punching to reveal different layers, some coloured mulling too, lots of distressing and a few more sprinkles of cosmic shimmer mist to complete it.


I created a little peep star in one of the tags to reveal the layers beneath.

I used 2 different colours of mist, one a peacock blue and the other a purple.


Tuesday, 8 May 2018

Funny Faces


Here are some photos from my Paint Chips class at the ATDML Retreat.  For this class we made the woodgrain background paper, there was gesso, ink, stamping, water.  

I then layered up some of the paint chip tags and papers, and made little star embellishments.  The final steps were to finish it with a few mist sprinkles.


You can see all the ink and layers of stamping.


I love the cosmic shimmer mists and that they have lots of mica so look different colours in different lights.

There are more pages to come from this collection....

Friday, 4 May 2018

Together


Here is a page I made with Cocoa Vanilla's Wild at Heart for ATDML.  The collection has lots of blues and pinks in it and some lovely water-coloured papers and butterflies too.  I went with lots of layers of papers - trying to layer up the curves bit.  I then cut out some of the elements - one of the butterflies and the large heart.  I teamed it up with a photo of our site-seeing in Paris, I love the architecture and the fact that just one lamp post or bridge gives you a clue as to which city you are in.

I added some golden chipboard - the title is from a chipboard collection from Hobby Craft, then a some sparkly golden gems.


Tuesday, 1 May 2018

Beach Boy


More beach shots with Hello Sunshine by Cocoa Vanilla.  I started this page with my watercolour background and then added lots of flicks of the paint too once the base was dry to get the two toned effect.  I used a Studio Calico vellum envelope as a shaker and filled it with sequins and added some stickers from the range to the top - the envelope was already beautifully stitched for me.  I then layered up my photos and papers.

I cut lots of words from the paper Happy Days and made a long list down the side with a small gap for my title.


Here you can see all the words.


This is a close up of the layers of colour from my paints.


LinkWithin

Related Posts with Thumbnails