Wednesday, 28 September 2011

Beach Games


I decided to have a go at the color room challenge again this week, here's the pallette.


 I'm still working my way through my summer photos - still got lots of beach shots to scrap.  This LO mostly consists of the remnants of my Handmade Hannah mini book kit - and grab boxes.  So the papers are MME Sunshine with a little Crate Paper portrait thrown in too.  I had seen a technique on Ingvlid Blome blog where she used a mask as a stencil and I assume painted in the middle - well that is what I did - I added a few bits of paper first and then I drew around and adjusted my prima corner mask in black gel pen, then I painted the middle with some glimmer mist. I used the remaining mist to splatter the page.  I re-layered all my paper that I didn't have to draw on and inked and ruffled the edges and stuck it down.  I ruffled my piece of burlap on a piece of double sided tape and then zig zag stitched it through my sewing machine, and added a few buttons and a pin.  I used my maya road doily to make another bakers twine wrapped embellishment and a few of the paper die cuts from the Crate Paper toy box range.  This is my first title that I cut on my silhouette - I am finding my way around the software and after a bit of playing I managed to cut it with a shadow piece of paper, as my papers didn't stand out as much as I wanted I doodled the word Beach on top and then painted it with a slightly watered down bit of glimmer mist, the rest of the title is authentique mini stickers.

So here are my kids playing on the beach - the faces of concentration - I personally always have a bit of a nightmare with beach bat and ball - the beach needs to be empty or else I can't play as otherwise I hit someone!!  Amazingly I don't think they did at all :)


Monday, 26 September 2011

Lego


This is a LO from Handmade Hannah grab box, I've used some of the crate paper toybox and portrait papers and also echo park country drive.  The die cuts and stickers are crate paper portrait and toybox and the alphabet is pink paislees mistables.  I started this with my shot of my youngest playing with his new lego fire station - lego is big in my house and this was his birthday present from us and there were LOTS of bags, but he happily sat down and started building it all.  I layered my papers up and marked the area where I put them in pencil.  Next I used my prima brick mask and sponged gesso (also in Hannah's shop) onto the paper, once dried (I did help it along with a heat gun) I then added some splats of red glimmer mist (this is also what I spritzed onto the lego title).  Whilst it was completing it's drying I inked and ruffled and stitched the edges of my papers - I put the photo in one of the toybox die cuts and stitched some zig zag on that and added a year sticker tab.  Once dry I put my papers back where they were meant to be, and then started adding the embellishment die cuts, and some pompom ribbon and a maya road doily. I stuck the fire engine and helicopter and number six down with foam pads to give a little more dimension here are a few more close ups - with all the die cuts this was quite a quick LO for me...and I still managed to get some paint and mists on it :)


Friday, 23 September 2011

Rose Flower tutorial

This tutorial is another mix of things that I have seen on the web, but it dosen't really require anything  more than paper and scissors and glue...you can add some distress ink colour if you like too.

So here are all the bits you need, a scrap of paper, scissors, glue and some distress ink which is optional.
Cut out 4 rough circles getting smaller
Make 5 triangular snips into the circles for the petals - dosen't matter how even you are or if one petal is narrower than the other.
To round off the corners just snip them off and this gives you more rounded petal shapes
Ink the edges, for this flower I have used tea dye distress ink, the ones on the LO were using broken china.
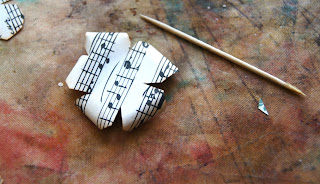
Using a cocktail stick curl each of the petals under except for the smallest flower
The smallest flower becomes the bud centre, so you pull the petals up and twist them a little - I use a bit of glue to try and make it stay together
Then add a bend upwards at the base of each of the petals so the flower takes on a basket like shape
Add a dot of glue to the centre of the largest flower and layer up the flowers, off setting them as you go.


Use the cocktail stick to hold the flower together until the glue starts to stick it
I also pull up the petals a little bit more and shape them
You can then add any glitter or rock candy to make dew drops.  Hope you have enjoyed it and please link me in if you have a go at this as I would love to see your creations.

I also have some exciting news as my LO Toastin' that I did based on the color room pallette is one of their featured LOs...really excited.

Wednesday, 21 September 2011

Vintage Photo Frame

Hi everyone, just a quick post to let you know that my tutorial and also one from Alexa using gesso are over on the scraprat blog today.  I covered the frame in one of the vintage atlas pieces you got in the kit, and then added some crackle glaze ink and a few embellishments - there are step by step instructions so do go over and have a look.

Monday, 19 September 2011

Toastin


This is my first LO that I have done using the color room palette, here are the colors.


This LO is a shot of mine and my friends kids toasting marshmallows on the bbq whilst we were camping in France this year.  The papers I have used were from the quirky kit, and are sassafras sunshine broadcast and American Crafts peachy keen.  I ruffled and layered up and stitched my papers, I had a play with my new ek success punch to create the torn book page border, and inked and crumpled that too.  I cut out some swirls with a Tim Holtz die and then coated it in gesso and inked over in distress inks.  The flowers are made the same way as on my charm boy LO, and a tutorial will follow shortly.  I gathered some netting on a piece of double sided tape and placed it under my papers, and a piece of ribbon below that.  I added some chipboard clouds and swirls of bakers twine stuck down on glue.  I made a little butterfly embellishment using my Martha Stewart butterfly punch, and layering on a 1" punched circle, I then mounted this on white cardstock and cut around it with scallop edge scissors.  I then wrapped bakers twine around the circle and stuck the butterfly in the centre and a pear shaped pin behind.


Saturday, 17 September 2011

I did get in the sea


This is my proof that I do occasionally go in the sea....it has to be hot for me to get in the sea, and I love body boarding too.  I used the August quirky kit for this page, and had a play with my new gesso and a new spellbinders rose die too.  I started by using a prima mask with the gesso, I made me own piece of card and used it to scrape and paste the gesso on the mask, I then layered up my pieces of paper.  The papers are mostly sassafrass sunshine broadcast, American crafts peachy keen and the text is GCD studio soul food.  I also added in a section of doily, the ribbon came in the kit and I cut this in half and layered it up as it is really thick.  My new purchase was the spellbinders rose die and I had seen a tutorial over on such a pretty mess that I had to have a go at.  I made the flowers out of some of the American crafts paper and manuscript paper, and then added a twine swirl to it all and sponged on some bits of gesso.  Here are some close ups.


Thursday, 15 September 2011

Strawberry Flower Tutorial


A long while ago....I had a request for a tutorial (from Hannah of Young and Crafty) to show how I made these strawberry flowers you can see the LO here.  The flowers are based on a picture I saw on the studio calico fabrips packet I had....and you will notice that I stitched the ones on this LO together, but they don't need to be stitched as I had to do all the other steps to keep them together anyway.

For this I used a sizzix die - the circles are about 2cm in diameter, size of a 1pence piece, though it would work for any size circle.  I used some white paper, brown distress ink and a yellow button and tape.


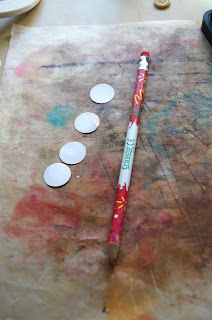
You need 4 circles for the petal and then one for the base.

Ink 4 of the circles around the edges, I used tea dye distress ink.
With a pencil curve the petal around the pencil
Cover the bottom of the plain circle with double side tape or glue, then start to add the petals.
Once all of the petals are added you can curve them up a little more
Add a yellow button to the centre, thread it through with some string and stick it using a dimensional glue - like silicon so that it doesn't crush the petals.  For strawberry leaves, I spritzed some card stock to   the colour I wanted and then cut leaf shapes out using pinking shears, then I used an embossing tool mark veins on and then inked the edges and some of the embossed area with distress ink.  I hope you enjoyed that and if you do make any do leave me a link as I would love to see them.

Monday, 12 September 2011

Charm Boy

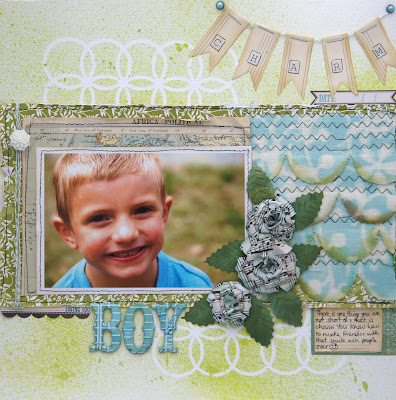
This is another LO from my scraprat kit, and a shot of my DS on holiday.  He is a very charming boy, he met some girls in the jacuzzi....I was assuming they were 7/8 but when I met them they 14/15 and he hung out with them at the pool and the evening movie - made me smile!  I got my mists out for this LO, and started by using my circle mask on the white cardstock and the green mist.  I also misted some of the large scalloped pink paislee ribbon with a mask over the top in blue, and then added some lines of zig zag stitching.  I used a large rectangle of the green victoria gardens paper as it matched the green in my photo, and some of the vintage atlas - I inked and distressed the edges, and added a little more stitching.  I made some bunting out of the manuscript paper and added the first part of my title to this.  For the mistable chipboard letters I just rubbed over broken china distress ink.  I made the flowers (this is probably tutorial worthy - I do have a little list of things I should show you :)) by cutting out circles and then 6 petal flower shapes and inking and curling them up, then made the leaves out of some spritzed paper and an embossing tool to get the veins.  Here are some more shots.


Thursday, 8 September 2011

Catching Waves


We have lots of summer shots of us all body boarding, it did end up getting a little too rough for the kids to go in and board, but the adults enjoyed it then.  This is another LO from my Scrap Rat Kit using the MME, Breeze paper, and some Echo Park, Victoria Gardens and Pink Paislee resistables.  I started this LO with mounting the photos on some white card and then arranging them on the green papers to work out how large the rectangles needed to be.  I then cut some of the large and medium resistable fabric to go under the photos.  To create the blue edge I punched some 1 inch circles and masking taped them and the fabric inside a pizza box to act as a mask on the the fabric and then spritzed them with some home made broken china mist.  Once this had dried (which was fairly quickly I then went over the line with some blue stickles).  I worked out where my papers and photos were going on the MME paper and did a little bit of cutting with a craft knife in the top right and bottom left hand corners...also I realised my papers would cover a beautiful butterfly so I cut out the area of paper that would be behind my green rectangles sand cut out the butterfly which I glittered and stuck on the page.  I added some white acrylic prints using some corrugated card, and stitched and ruffled all my papers.  I made some toothpick flags out of the off-cuts of paper and spritzed my mistable title with the peacock blue mist, and then flicked a few bits around the page. I curled and ruffled and stitched all my bits of paper, and gathered the mistable fabric so it rippled, added a few of the brads and this is what I came up with.  I will try and do a little tutorial for the mistable flower that I made - just need a sunny day :)

LinkWithin

Related Posts with Thumbnails