Tuesday 30 July 2013

10


Another page from my ATDML Fancy Pants Kit, this uses the Trend Setter paper collection and there is a lovely page of numbers which I spent some time cutting out.  

I started the page with some white gesso - and then cut some of the border strips out and arranged them down the middle of the page - I did some pleating and stitching to add a little more interest to them too.  I then added some more horizontal strips behind my photos and scattered the numbers around the photo, using the 1 and 0 to make my title - to make them stand out a little more I drew a line around the edge of each one.  I used a few stickers, and cut out the tags from another sheet of the paper (there are loads of little bits you can cut out with this collection).

This was me eldests birthday complete with my attempt at a multicoloured layered cake (like a rainbow one, but not rainbow colours) - it was an enormous cake but he was very pleased with it.


Tuesday 23 July 2013

Always Performing


Well after a small computer 'ahh is it going to work again' it is all fixed and I am back to the world of blogging (and it was one of those computer things where nothing much had to be done so maybe it was dust or something just wasn't quite clipped in well enough but it did manage to make it un-useable!)

Here is my page for this fortnights Studio Challenge which uses a sketch by Val Mangan based on one of Chantelles pages - I do have several of these photos in different poses, so I could make a double page of it, but 2 is perhaps enough! :)  I used lots of Crate Papers DIY shop, a bit of layering and stitching and my favourite viewfinder (is that the word for it) die cut - I did save the other half!  I am really trying to use the things I stroke more....like the polaroid die-cut from Studio Calico too.  I'm loving little glassine envelopes for the journal pocket behind the photo at the moment, and I bought some new doilies in Waitrose (you can just about see it) and I inked it with Tea Dye distress ink, a scattering of sequins, then a mix of alphas from American Crafts and Carta Bella, the writing on the the Carta Bella stickers was white and didn't stand out enough against my page so I went around the edge with a black gel pen - I really like the hand made look that gives to it too.

Here is a link to lots more inspiration over at the Studio Blog and I hope you all have a super day.

Also I have a post up over at Created by ATDML looking at stamping a bit more on pages - here is the link.


Thursday 18 July 2013

Printers Tray with Tando and BoBunny


Can you believe it this is my 1st printers tray!  It is a beautiful frame of chipboard created by Tando, and it comes in layers, so it isn't really deep but just the perfect size for a few embellishments.  I made this for my husband for Fathers Day and I used BoBunny's Forever Fall collection as I loved the turquoise and orange combination.

I started by covering the back board with some of the turquoise BoBunny paper, I then covered the front sheet of chipboard with gesso, dried it, added cosmic shimmer mists in blues, reds and orange, then dried those too.  I then went to work on the little windows, filling 2 with some favourite photos of  our children, then added banners, keys, lace, some clay flowers I had made as well as using my Spellbinders ironworks die to create the doily.  I also made some bunting using my sewing machine and small triangles from the papers.  The alphabet is by October Afternoon but I inked and doodled on it so it looks a little different now.  I covered some Tando butterflies in paper, sanding the edges and inking them, then I drew on the patterns with my gel pen and added a trail of pearls from the larger one.  A few sequins and shells and bling....and just about there.  The tray also comes with a little stand which I just inked brown with some distress ink.


Monday 15 July 2013

Happy is with a Bucket


A beautiful sunny day and so this shot feels quite appropriate - it is from our holiday last year and my youngest on the beach, completely content with a bucket in hand!  The papers are from the kit I was sent by Mel and Jill from ATDML - I've not used lots of Fancy Pants papers before now....but these are gorgeous, so I'm definitely going to loo out for them. This range is called Park Bench and it's really beautiful colours all blues, yellows, greys and black so very elegant.

I started the page with my grey damask background, a cut an inch of 2 of the sides.  I then worked out where I wanted all my papers to be - I used a bazzill scalloped circle as the template for my big circle scallop and distressing the edges of mine hid any imperfections in my cutting!  I used a plate for the yellow polka dot circle and then went around it with liquid pearls, then layered a glassine envelope for the journalling and doily.  Fancy Pants also make co-ordinating banners so I used these in the left hand corner.  Once I roughly knew where I wanted everything to go I then added some gesso to the background and used my chalk inks to add some colour - you can see more detail about the technique here.  The final bit of embellishments are a Tim Holtz rosette flower, some wood veneer and stickers.  The alphabet is Heidi Swapp and I typed the 'is with a bucket' using a free vintage typewriter font on my computer, printed it on scrapbook paper and stapled it to the page.


Friday 12 July 2013

Tando's Book Week


This weeks focus on the Tando blog has been on the beautiful Book covers designed by Neil Walker.  I chose to work with the geometric patterned one, and I have to say when it arrive I got it out straight away and began my layering.  I started by priming the covers with white gesso, then on the front cover I used some texture paste and the Tangled Yarn mask...I then layered up the flowers and butterfly (didn't really matter what colours as it was all getting a good inking.  I then used some Cosmic Shimmer mists in my favourite colours and did each layer of chipboard a slightly different collection of shades.  SO once the base was done, I then did some stamping and used liquid pearls to decorate the next layer, for the top one I used lots of purple mist which I then flicked water over, then I wrapped it all in twine which I misted and glittered.  I used my big bite to punch the holes....my recommendation for you though is that if you are going to layer up all 3 layers of chipboard then punch them before you stick them together as it will b much easier!  For the central piece on the front I used a Crate Paper copper sticker frame that comes in their Cake Walk collection, to grunge it a little I made an inky background for it to sit on and then rubbed gesso over the top to dull the coper a little.  A few pearls, sequins and beads and the front was done.


A similar but slightly plainer look to the back.


Here are some close ups of the details


and the inside, I used some of the Maggie Holmes papers and as these are not double sided I made pockets with them, stitching around the edge, I've only made 4 pockets so far but with the jump rings I can always add more.

For lots more beautiful book inspiration here is the link to the blog, and also I have a page over on Created by ATDML looking at a chalk ink effect I've recently discovered - here is the link.

Monday 8 July 2013

Love this Boy and the twine challenge


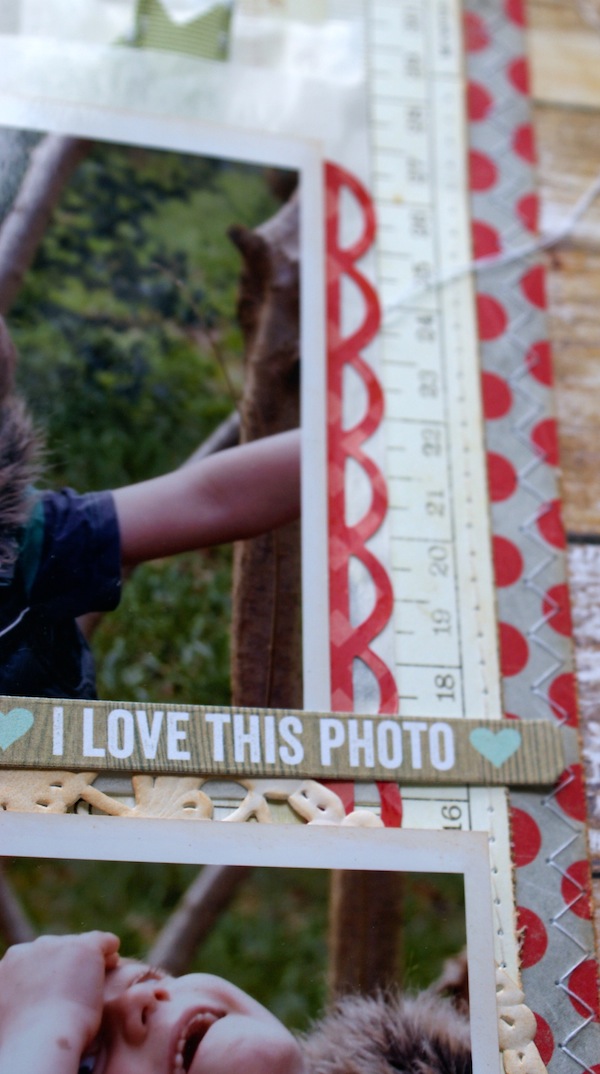
Hello on a sunny morning and here is my page for this fortnights challenge over at the Studio Challenge blog, and the challenge is twine!  My Mum and I split a pack of American Crafts twine that we came across in TK Maxx and it was perfect for this challenge as there are so many colours.  So the twine on the page, I often use twine to wrap around things, so I wrapped the hearts in twine and then with little glue lines hung the hearts from my photo.  I did also make some twine flowers which will have to appear on another page as despite having me in the photo, so fully justified on having a few flowers on the page....they just didn't go!

The page is a mix of American Crafts Dear Lizzy and also Amy Tangerine's Yes Please collection, I layered up lots of different size papers and inked, stitched and distressed them.  I am also enjoying using vellum on my pages again - funny those loops in scrapping, I embossed it with my cuttlebug swiss dots folder (one of my go to embossing folders) and added that as another layer.  Nearly forgot the start of this page, so I used some texture paste and Tando's Random circle mask, which I let dry.  Then in my experimenting I added some gesso over the top with a palette knife, let it dry....then the chalk inks - I discovered this on Ingvlid Bloms blog, just using coloured chalk inks over gesso to make a cloudy sort of pattern...so easy and beautiful, so I went around the edge of the mask over the gesso with different colours I had pulled from the papers.  Next in an art journally style I stamped with the AC acyrlic grid stamp, doing the rolling stamp thing.  Then a little stamping with some very old Autumn Leaves flourish stamps, and then all the papers and hearts and twine.  I also cut out one of the Dear Lizzy mason jars and filled it with sequins, used some Teresa Collins word stamps and my new smash date stamp.

The photo is from our holiday back in half term, just near a climbing wall - I had a play overexposing it on the computer and making it black and white, and really like the way it turned out.


Wednesday 3 July 2013

Happy Snaps


Ages ago I showed you a picture of my son with a silver bowl on his head (here)...well here is one of the more sensible shots!  

The papers are a mix of Fancy Pants Trendsetter and then a beautiful Ombre background from American Crafts Dear Lizzy.  I started the page by taking out the centre of the woodgrain paper so I could save it for another project and then added the Dear Lizzy paper to it, distressing the edges, I also damped the paper and pulled it down on a couple of edges and layered some paper and a punched piece and secured it all with a button.  I made my own bunting with some hand cut triangles and then some of the longer flags that come in their embellishment packs.  I made a little rosette flower with my sizzix die, then used a mix of embellishments from Crate Paper Cake Walk, Simple Stories butterfly sticker, Studio Calico wood veneers, Glitz washi tape, a Teresa Collins photo sticker which is attached to the journalling behind the photo and Prima's alphabet stickers.  It's quite a pink page for me, but with my niece wearing a bright pink cardigan I thought I could get away with it!

If you would like some more Fancy Pants inspiration then check out the gallery over at ATDML - here is the link.


LinkWithin

Related Posts with Thumbnails