Showing posts with label glitz. Show all posts

Monday, 24 February 2014

On the Meridian


Here is another page I made with some of the lovely Marion Smith Nirvana collection, and I did get quite messy with it!  Here is the pin that inspired me…pin - it is someone's artwork so I didn't want to copy the image here :)

So I started with a layer of gesso in a V shape and then my gelatos. There is a small circular sponge tool that you can get with them, I damped this and then popped loads of circles in that V shape all over the page in blues, silver and a some gold.  I had a look and wasn't too keen on the very spotty effect with my pictures, so I added some more gesso, and then smudged in gelatos and spritzed with water and then some cosmic shimmer paint to get drips….and this is the rather messy background I got as a result.  I next went to work cutting out little pieces from the Marion Smith papers like the hot air balloons and little tags, and added some 7 gypsies cogs as well as prima lace, and behind the photo is a little journal card - Remember this - all cut out from the papers.  The title is from the Glitz Finley collection.

Even though the page didn't quite turn out as I had imagined in my head, I quite like the mess, and enjoyed making it!


Sunday, 5 January 2014

2013 - a little review


The challenge for this fortnight is to look back over the previous year, I did this in pictures (I was initially worried that I would not have one for every month, but I did and had lots more I could have used!).

With the 12 photos the easiest way to lay them out was in a grid and it works nicely with the numbers of the year in the centre.  I used strips of Glitz's Finley collection, I love the bright colours in this range, and layered up all the papers - using the remnants from my strips to layer behind photos.  I decided to use wood veneers as my embellishments as I had different ones that suited the seasons and events that happened, and I used my Simple Stories month stamps, cutting them out to label the photos with when they were taken.

If you fancy joining in this month, and there is the chance to win a prize too, as well as see all the other wonderful inspiration then here is the link.


Saturday, 4 May 2013

A bit of Glitz and inks - Big Grin and Beach Love


Firstly a happy National Scrapbooking Day to everyone, and I thought I would show you the other class I taught at the ATDML retreat using the beautiful Unchartered Waters papers from Glitz.  We made 2 pages from the kit and had a go at an inky technique using cosmic shimmer mists - you can see a tutorial which shows you the basics for making the inky background under my tutorials section if you want to have a go.

The photo is actually a Christmas one of my brother and son, so you don't have to just do beachy pages with the papers, I love all the ombre and blues and aquas in the papers.


The next page was using one of the chalkboard papers in this range...a trend that is really popular at the moment, we made some vellum envelopes and chopped and embellished using a washing line.


Also....Tando Creative are having a Design Team call - they are a fantastic British chipboard and mask company....the ones that make the beautiful octagonal Christmas tree advent calendar.  It's a super company to design for so check out their blog for all the information - here is the link.


Friday, 19 April 2013

More Glitz and the Olympic Flames


You'll notice a theme to the Glitz pages I created for the ATDML gallery....the rediscovery of my Olympic photos.  We were lucky to get some tickets for the para-olympics last year and saw some amazing sport and loved the whole olympic experience.  One of the most beautiful pieces of artwork at the Olympics was the cauldron of fire, I loved how lots of different representatives brought in the copper bowls and then these were attached to sticks and raised up, then set on fire, so when we were in the stadium we took a few shots.

My page uses the Yours Truly range from Glitz, I used the floral sheet to back my cardstock (and I gutted the middle), then layered up a few more sheets behind the photo - distressing the edges.  I had a go at making some peeping lace down one edge, you wet the edge of the page where you want the dip in and gently push the paper down, I backed it with some lace and added a button.  Lots of stitching around the edges of all my sheets, then a pile of prima flowers and some prima swirls....and lots of sequins - which did take me a while to stick down!  The title is a mix of some Simple Stories and K and Co.


Friday, 12 April 2013

Glitzy Cards


The gallery is now up over at A Trip Down Memory Lane and we got sent some beautiful Glitz papers to play with - I received Cashmere Dame and Yours Truly...so here are a couple of the cards I made.

I like to use up lots of the smaller bits of paper that I have left from my pages on my cards.  On the 1st card I stitched, inked and layered them.  The bingo card is a stamp by  Teresa Collins which I used on white cardstock and then covered with tea dye distress ink.  I made the rosette flower (though I have now invested in a Tim Holtz die!). 


The stamp for this card I picked up on my holiday in the states - can't resist a camera!  I started the card using a new Studio Calico mask I couldn't resist.  I inked up a make up sponge and rubbed ink through the mask (I masked the mask with paper so that just the 2 lines of chevrons came out).  I then layered up my off-cuts of paper, some washi tape and wrapped some MME twine around the card too.

If you would like to see lots of lovely Glitz pages then check out the gallery here, I'll be back later on to show you my pages.

Monday, 18 March 2013

The Orbit


 I recently discovered some of my Olympic photos....which I hadn't scrapped (hangs head ashamedly) so this is my page for this weeks sketch over at the Studio (which is based on one of Daphne's lovely pages) and using some of my favourite Glitz papers (however with all that I am still not that sure about the page - don't know what somewhere in the the combination of colour and photo - or it could be something else!).

I cut out and embossed some more hexagons with the cuttlebug swiss dots embossing folder, I also embossed my thin yellow strip (by very carefully cutting a small slit in the hinge of my embossing folder!).  I layered up all my pieces as per the sketch, had a go with my glitz roller stamp with white ink on vellum (love that effect) and added some more chevrons to the piece.  I scattered some sequins and had a go at some stitched arrows too - they are really easy to sew - I made my self a little template and then stuck it with washi on the page, punched through the holes with my needle and then stitched in blue embroidery thread.  The last few bits were some Simple Stories sticker words and MME All is Bright Washi tape.

If you'd like to see the other beautiful pages over at the Studio here is the link


All the embossing and the white chevrons.


a little close up of the arrow stitching.


Some more layering and the alphabet stickers.

Also my friend Dawn is having a giveaway on her blog...here are the goodies


She is a super scrapper and bakes some amazing goodies...as well as doing all sorts of other crafty things too so do check out her blog here.


Thursday, 29 November 2012

ATDML Retreat - part 1


A little while ago, over half term I went on my 1st ever retreat with A Trip Down Memory Lane at the lovely Stoke Nyland golf club.  It was lovely, when I arrived there was a desk set up for me and a pile of goodies to get me going as well as a list of challenges I could enter.  Then there was the shop - piled high with paper and embellishments, lovely food, a great list of classes and fantastic ladies to craft with and be inspired by - I loved it!  I still haven't finished all my classes as some were mini books and  I need to fill them up with photos and finish them off before I show you, but here are a couple of pages.  

My 1st page was a little kit that we were challenged to make something from, I am not sure of the paper manufacturer but the colours went really well with this rather damp beach scene - my kids love the beach as you can probably tell and even when it has been wet they are still up for spending a couple of hours digging and seeing what they can find.  The flowers are prima and some lovely maya road natural buttons, I added a few ink splatters using my distress stain, and stamped the title with the Kaisercraft typewriter stamps and the other words are from the Teresa Collins Vintage Findings stamp set.


 Next for my class.....


This is the class that I taught using the lovely Cashmere Dame papers by glitz - packed full with colour and distressing and hexagons.  The photo is from our holiday state side and is of Naples Pier and all the pelicans that fish around there, there are 2 photo tabs which have some pictures of my Dad and my son watching the pelicans from the sea as they flew around.  So alongside the papers and paint there are some prima flowers and alphabet and Websters lace - we used some cosmic shimmer mists to change the colour of the flowers, and milk bottle tops to do some printing too - so generally fairly messy!


Monday, 5 November 2012

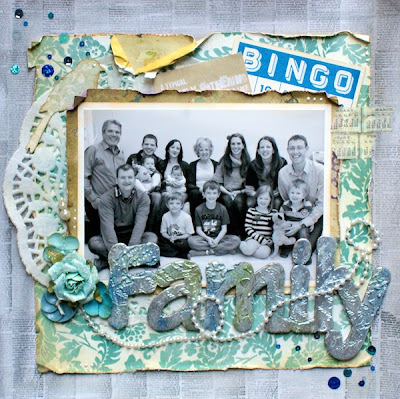
Family


This weekend I was invited to teach my 1st retreat class at the A Trip Down Memory Lane Retreat...I had a great time and met lots of lovely ladies and created loads of projects which I will be back to share with you and I am sure there will be pictures on the blog to show you what we got up to...but in the mean time one of my projects was posted on the Tando blog yesterday so here it is.

The focus for last week was on letters, so I used their large Family Chipboard as the title for my photo.  The photo is an Easter shot of my side of the family - my Mum loves these photos and fortunately all the kids are still very obliging.  The page started with the background which is some black glimmer mist painted across the paper and then stamped with a MME text stamp. The papers are by Glitz from their Beautiful Dreamer collection - I love that the other side of the blue has yellow so it really stands out when you tear it or crumple it.  Also in there are some of my poundland sequins, a prima canvas shape that I inked, a vintage bingo card and journal spot as well as a doily so prima flowers and a pin and pearls from a haberdashery shop.   For the chipboard word I covered it in several layers of embossing powder and UTEE - starting with silver and then adding a bit of green and blue.  Once it was all molten I then stamped into it with a wooden rubber stamp (don't use you acrylic ones) - I stamped it in 2 sections as it is quite large and I was worried about the melted UTEE solidifying quite quickly.  The beauty of this is that you can keep remelting until you are happy with the effect.  The last touch was to gently go around the letters with some clear embossing powder and then add some white perfect pearls for that extra shimmer.


Friday, 11 November 2011

I need a Carry


This is a photo of my DH having to carry my DS as we were on a stoney beach and they kept getting in his crocs LOL. 

 For this page I used quite a few bits from my beautiful Handmade Hannah grab boxes, the doily is from the embellishments box, the date stamp is from her shop (I love it as you circle the date and add the year).  The Papers again are mostly from grab boxes, crate paper Portrait (designed for weddings but it is so versatile I love it) and there is a small scrap of glitz and American Crafts too.  The Rose embellishments are from the Portrait collection, and the chipboard is maya road and I managed to fit in a glassine pocket for my journalling.  The alphas are Echo Park for the record and the glitter one is American Crafts, the other stamps are MME.  So those are all the little bits.  

I started this page by using a Crate Paper die cut to fit my photo in and then I backed it with some of the green Portrait paper and edged it with scalloped scissors.  I cut up my papers and started layering them how I wanted them to look, once happy I inked the edge with black memento ink and then ruffled the edges.  I layered them all up and then sorted out the glassine pocket by folding the top over and stapling some string that could hook around the teal brad.  Then I started layering the embellishments,  I made some flags to go down the edge of the page and added bits of book paper to these, then I slotted in the doily and added a 3 embellishment combo which includes a snowflake :)   I ruffled and added a rose to the other side of the picture and a seagull pin I got in a quirky kit.  I then stamped my chipboard banner, 2 are stamped with a newspaper print in broken china distress ink, and then the centre one has the Boy stamp. I covered them in PVA to add a different texture to them and then added some book pages to the 2 print ones, and finally smeared some liquid pearls over the top to give a bit of shimmer.  I threaded through some twine and added the title and some more little blobs of liquid pearl.  

So this is my attempt at the layered page prompt for Shimelles pretty paper party, I concentrated on lots of layering as well as keeping it fairly simple in colour (not something I often do).  Hope you like it.


Saturday, 15 October 2011

Laugh Often


This is still one of my favourite collections of echo park papers (For the Record) and I'm nearly through it all now too.  I'm still not absolutely sure about this page - don't know why but I LOVE the photo - it is a shot of my DS in the before mentioned canoe on our local lake, and I have no idea what he is giggling about but it is a real belly laugh and makes me smile everytime I look at it.  There are a few other papers in there, like the blue dot glitz paper, and the crate paper doily, and the ticket and pin which all came in my Handmade Hannah kits.  I made the fan flowers a while back, I like them as they feel quite masculine, and the swirl is from the for the record sticker sheet.  I had a go at some lacing and used some blue embroidery silk - I pre-punched the holes with a needle and then stitched all the lacing. I did have a go at some more spritzing which came out a bit too bright for me (well my intention) however I wasn't able to turn the page over this time!!! (:)) so just went with it.  The title I die cut on my robo - on the word laugh I added an American Crafts fake stitch edge to the letters too - the word often I had to very carefully remove from the sheet - couldn't work out any way to make the font thicker - but I am just learning.


Monday, 22 August 2011

Nestled in the Woods


Here is my first page using my grab box stash, this is a shot of my youngest in some woods near his grandparents house....of course up a tree :)  I liked the nature elements of the prima paper and the colours seemed to fit well with the picture....the other thing I noticed on this paper was that Prima give you a little block of colours, along the cut off strip, that co-ordinate with the paper which I think is a great idea and can make it easier matching everything together.  I started the page by cutting around some of the leaves and bird nest so that would be able to pop over my picture.  I mounted the photo on some white cardstock and then used some prima stamps to stamp around the edge - to co-ordinate with the paper stamping around the edge, and inked it with tea dye distress ink and then ruffled the edges.  I then layered up the glitz papers that were in my pack and matched with the prima colour blocks, stitched and inked and ruffled them and used a cocktail stick to curl down the right hand corners.  Once I knew how large these pieces were I think carefully cut a chunk of the prima paper out so I could use the other side - the dotty yellow/brown piece and inked and ruffled that too.  I then spritzed using my broken china distress ink mix on to the prima paper - just a little bit of blue. 

The flowers are made from the glitz papers using the rose tutorial, and I added some leaves and rock candy stickles to them.  I also found a bird stamp which I coloured with some pro-markers and cut out, and punched a mini butterfly from some left over paper - then doodled the wings (loosely copying the prima ones) on to it.  I used some of my crate paper die cut sheet for the photo corner and the boys will be boys piece, and the brown envelope that came in the box hides my journalling.  For the envelope I used the crafty individuals woodgrain stamp - I cut a small rectangle for the mask and then stamped over the envelope and hand-wrote Notes on it.  I added a small tag and some seam binding.  The alphabet is glitz (came in my last grab box) - little bit of glossy accenting on the butterflies and here are some close ups :)


LinkWithin

Related Posts with Thumbnails